This Manual provides information on the interoperability between the EFSA’s Knowledge Junction (KJ) and the FSK-Web model repository by using three workflows.
Overview
After login to the FSK-Web Protected Area you will have access to the online services by using the following workflows:
1
The workflow UploadToZenodo allows to upload a FSKX compliant model from the FSK-Web model repository to the EFSA’s Knowledge Junction (Zenodo repository) via its REST interface.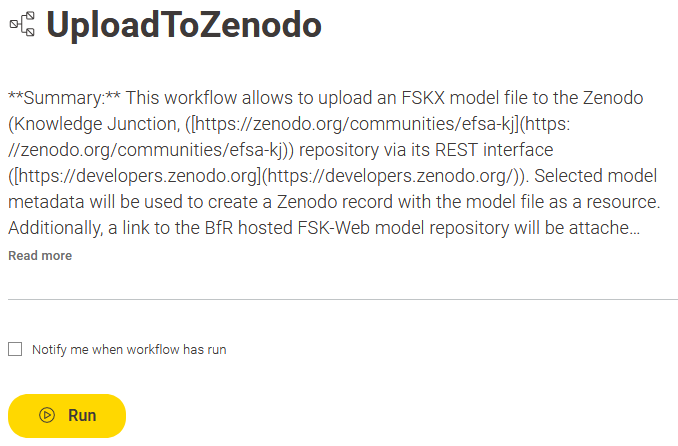
Start the workflow by clicking on the Run button.
The workflow provides the main view of the FSK-Web model repository. This view shows a tabular collection of the available models. 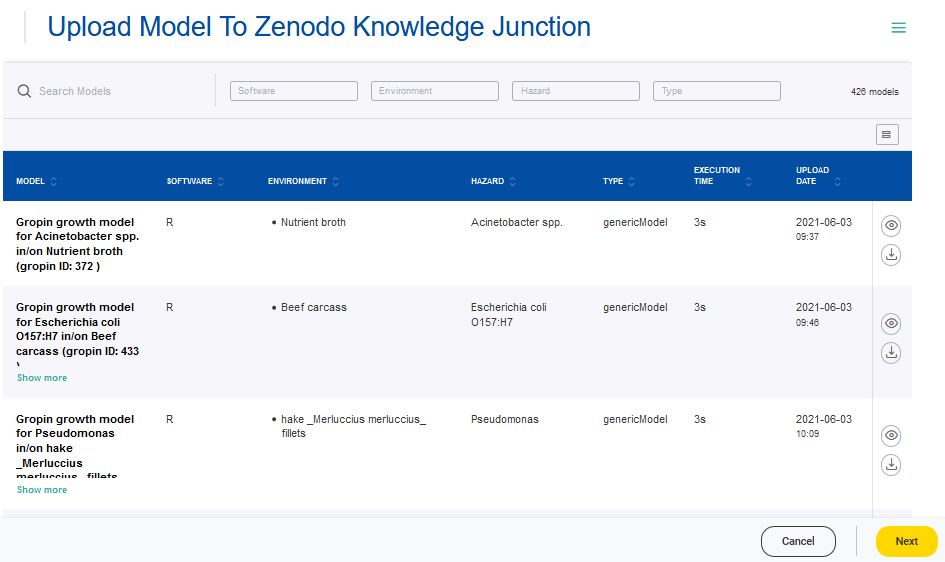
It includes search and filter functionalities for the main model metadata “Software”, “Environment”, “Hazards” and “Type”.
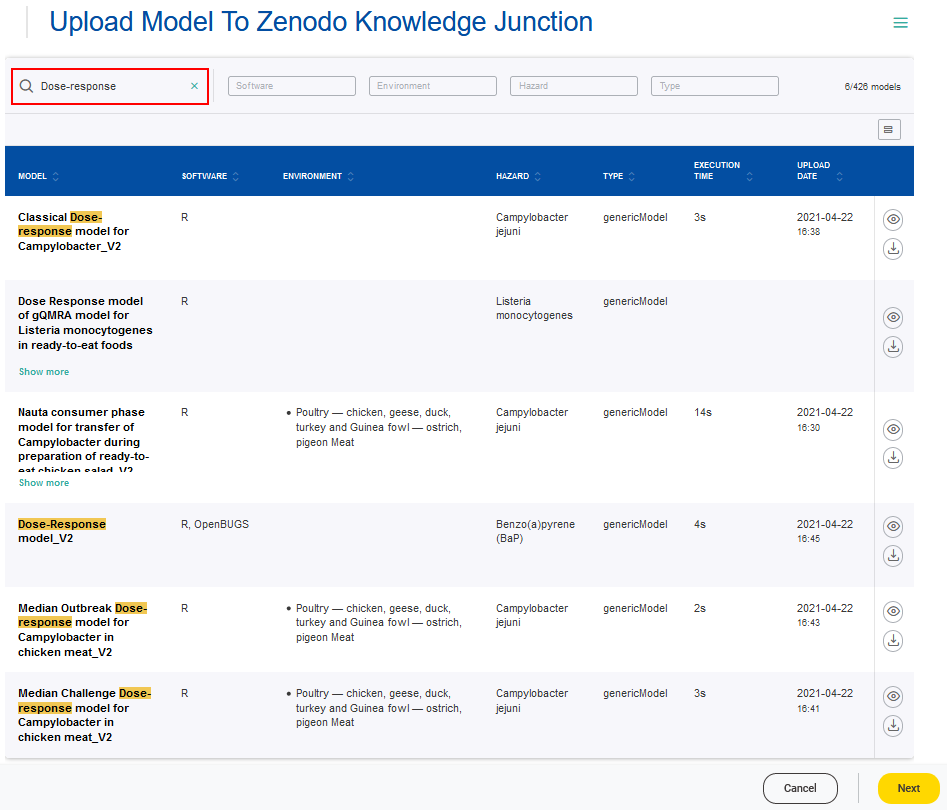
- Entering a keyword into the search box allows filtering over the model metadata
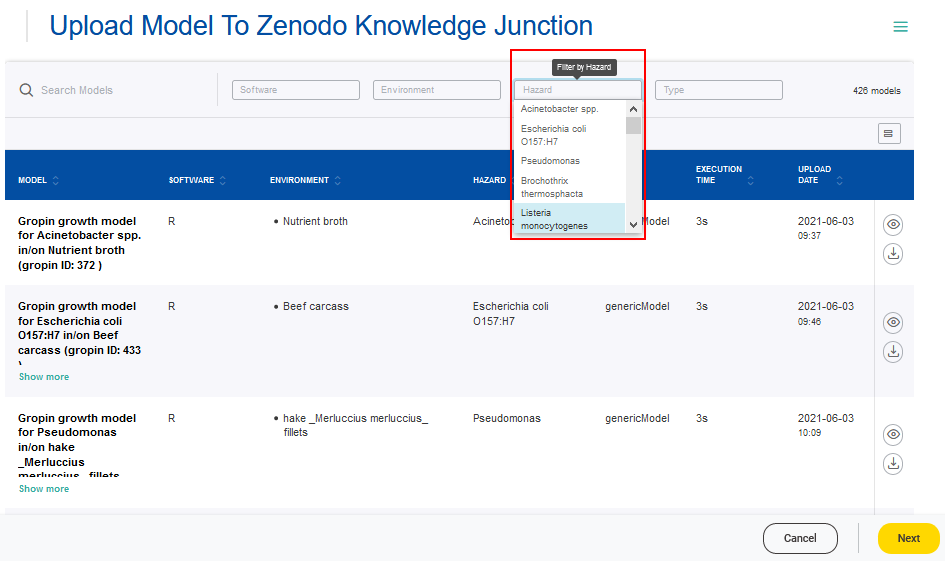
- Clicking on the filters will show the entries available for selection
The full model metadata can be accessed via the Details button. 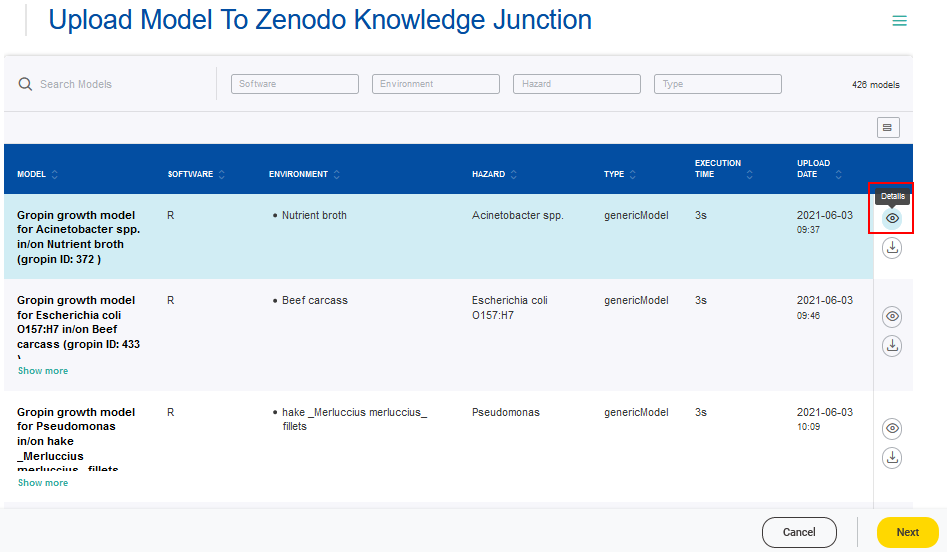
According to the FSKX specifications, the model metadata cover the four main categories “General information”, “Scope”, “Data background” and “Model math”. For each of these main categories the metadata are presented in a structured form via different tabs. Furthermore, a plot of the model result for the default simulation is provided as a preview. Also the code for the mathematical model and for the visualization of the model result is available for review.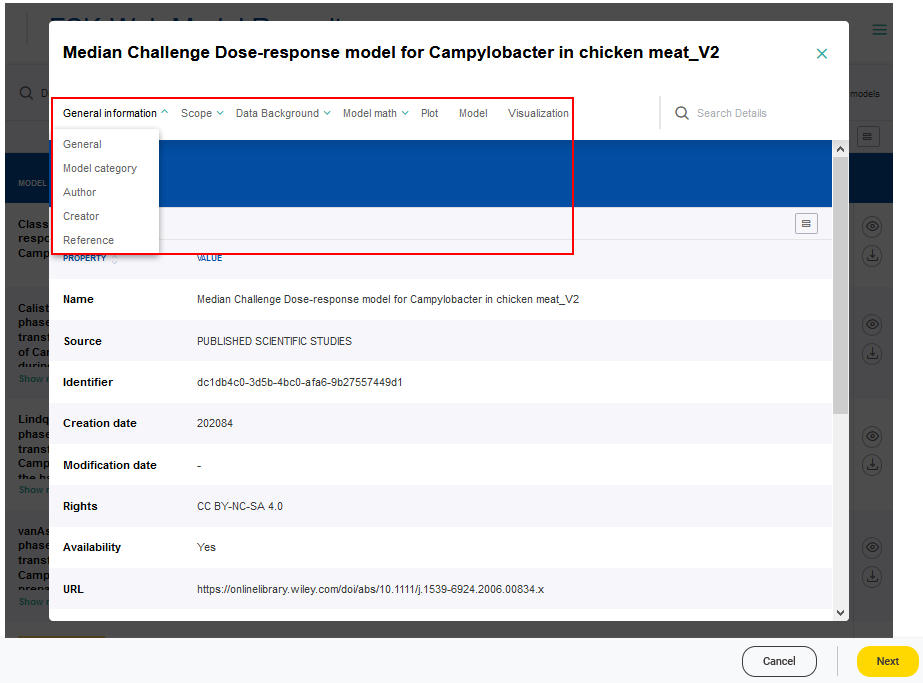
The FSKX file of a model can be downloaded via the Download button and saved to a local device.
The workflow provides the functionality to upload a model from the FSK-Web Model Repository to the EFSA’s Knowledge Junction. Therefore, a model of interest has to be selected form the table (checkmark) followed by clicking the Next button.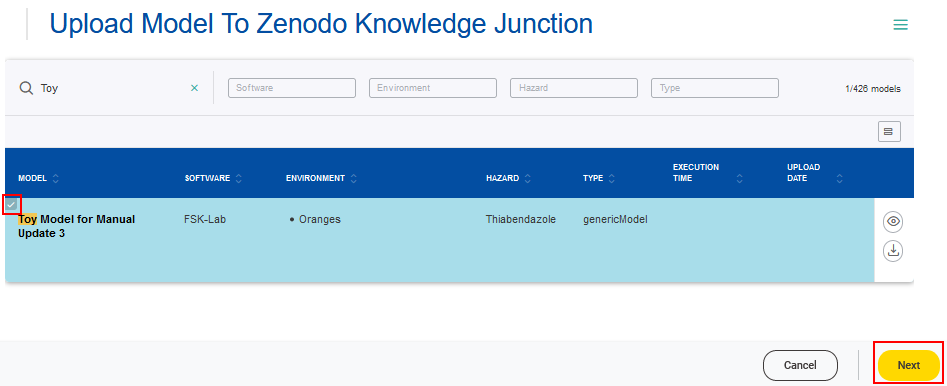
The workflow loads the metadata from the FSKX model file that are required in the EFSA’s KJ (Author, Title, Model Description, Version, Language and Additional Notes). If necessary, these metadata can be edited before registering the selected model into EFSA’s KJ by clicking the Next button. 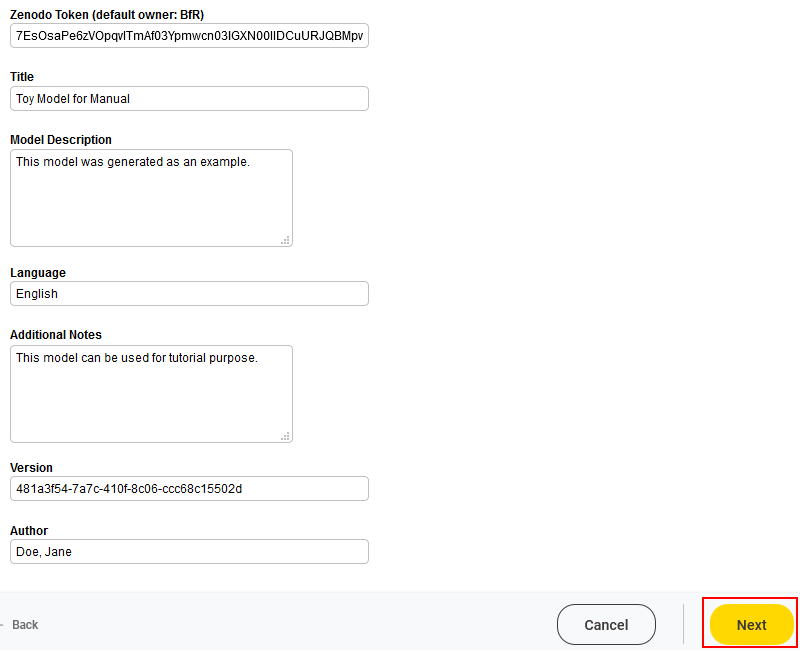
The workflow automatically generates a report providing the URL of the new EFSA’s KJ entry. 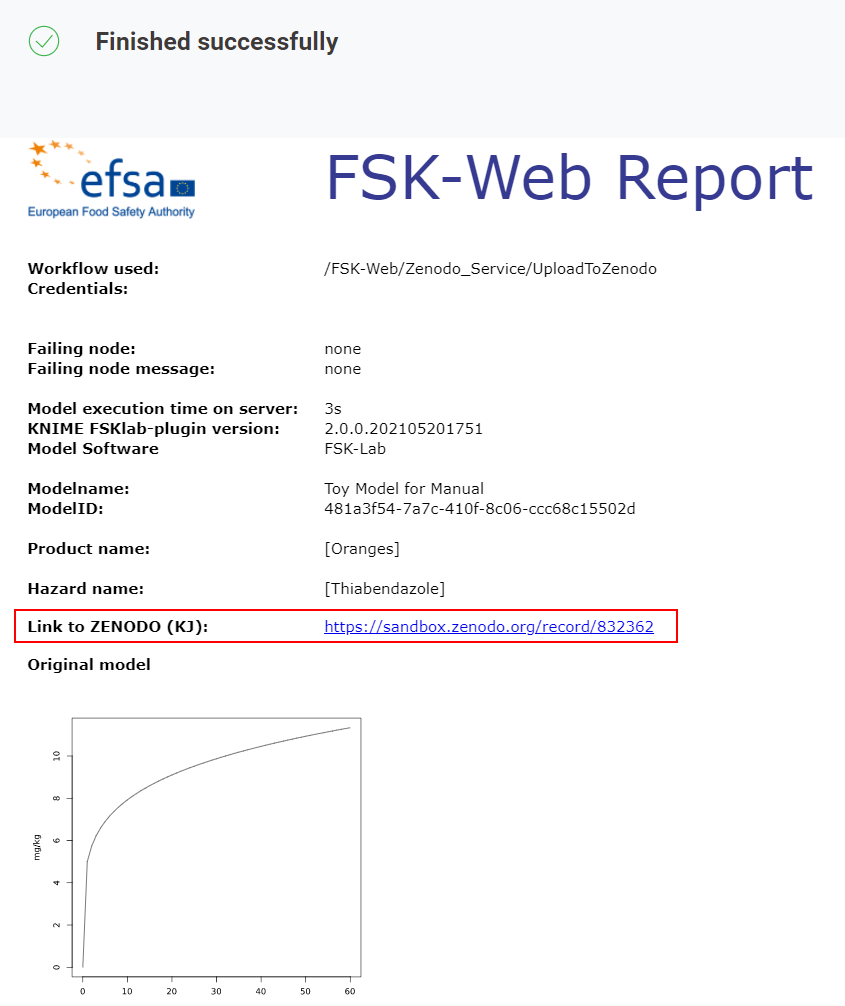
The new entry is submitted to Zenodo as candidate for EFSA’s KJ and undergoes a curation process by EFSA before it might be included in the KJ.
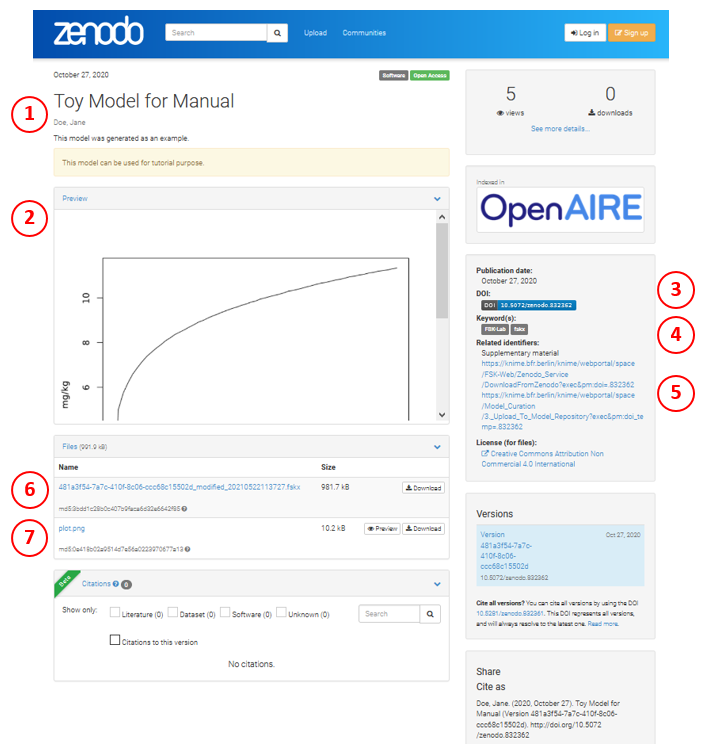
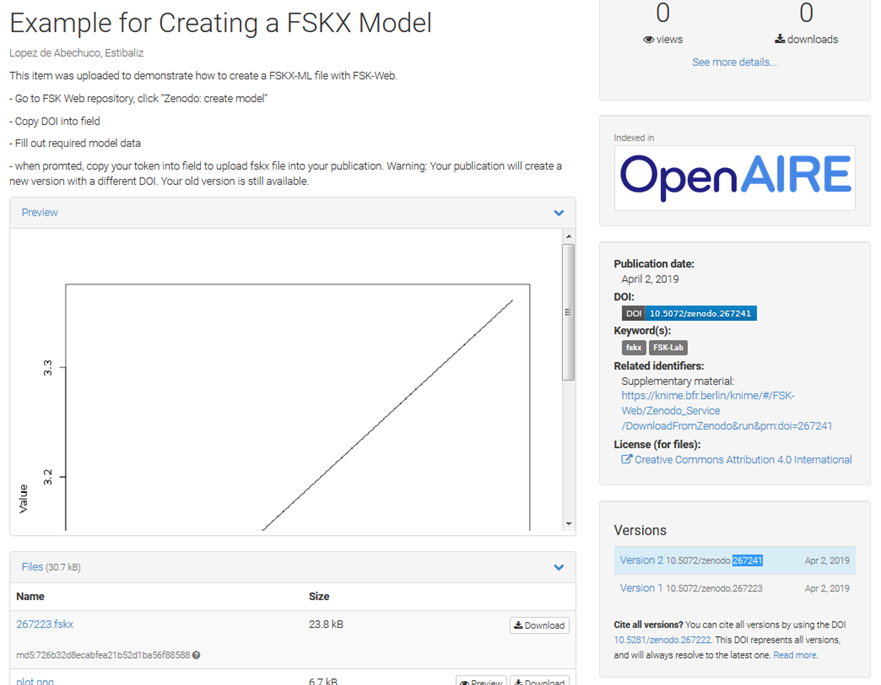
The newly created candidate entry generated in Zenodo from a model of the FSK-Web model repository via the UploadToZenodo provides the following information:
- Relevant metadata from the FSKX file (1) and a preview of model’s simulation results (2)
- An automatically generated DOI (3)
- Keywords “FSK-Lab” and “fskx” for easier searching (4)
- A link that allows direct execution of the record’s FSKX file in FSK-Web (5)
- The FSKX file and an image of the model’s simulation results (6 and 7, respectively)
2
CreateModelFromZenodo Workflow
The workflow CreateModelFromZenodo allows to create a FSKX model file from a EFSA’s Knowledge Junctionrecord (Zenodo repository).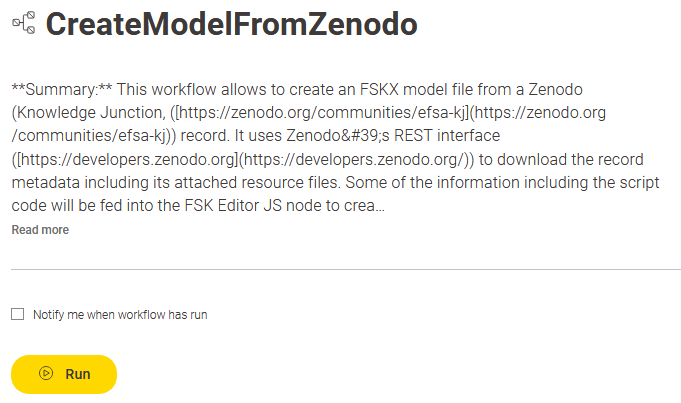
Start the workflow by clicking on the Run button.
After providing a DOI from Zenodo for a model of interest the record metadata including its attached resource files will be downloaded by clicking on the Next button. 
The workflow provides the opportunity to annotate and encode the model in accordance with the harmonized metadata concepts and the harmonized information exchange format of the FSKX standards.
In general, the creation of a FSKX compliant model is based on the following information that should be provided by the model creator:
-
- metadata to annotate the model
- code for the mathematical model
- code for the visualization of the model result
- resource files (e.g. for datasets) if the script code requires them
According to the FSKX specifications, the model metadata cover the four main categories “General information”, “Scope”, “Data background” and “Model math”. For each of these main categories the metadata are presented in a structured form via different tabs.
Further information about the FSKX format including the FSKX guidance document are provided here.
Guidelines regarding the “Minimum Information Required to Annotate food safety Risk Assessment Models” (MIRARAM) can found here.
Metadata fields, which are highlighted with asterisks (*), are mandatory fields with respect to the MIRARAM guidelines. Depending on the purpose for which the user wants to create the FSKX model, it might be possible that there is no need to fulfill the MIRARAM requirements. Therefore, it is not necessary to fill theses metadata fields in order to run the workflow successfully for creating a new FSKX model.
Information for every metadata field is displayed when clicking on the corresponding i symbol. More details and definitions for all metadata fields, that are relevant for describing data and models, can be found here: Metadata_Master_Table.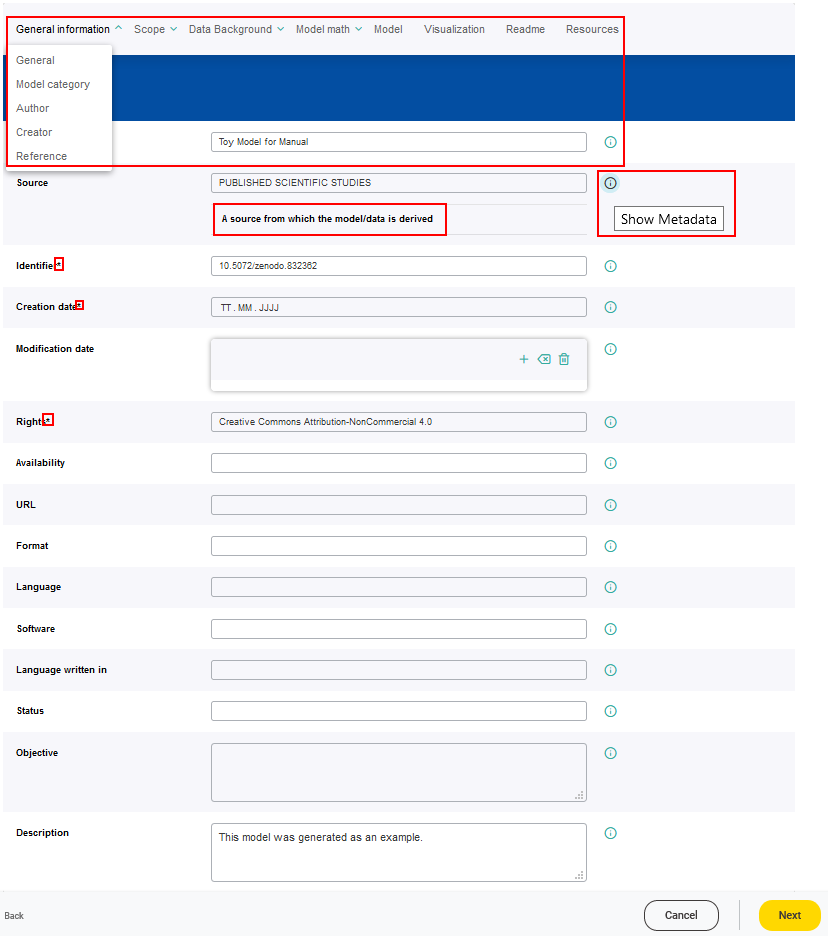
A FSKX compliant model allows to create and execute different simulation scenarios. Therefore, parameters have to be defined by the model creator. These parameters are used as variables within the model code. The parameters are classified as input (variable or constant) or output parameter. Each input parameter has an initial value, to generate the default simulation. Without the specification of parameters the FSKX compliant model will not be executable, that means it is mandatory to provide parameters.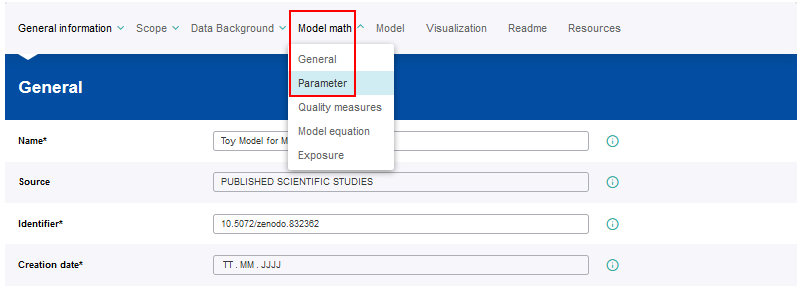
In order to provide parameters, a set-up window for the metadata setting has to be opened by clicking on the Add a Parameter button (plus symbol).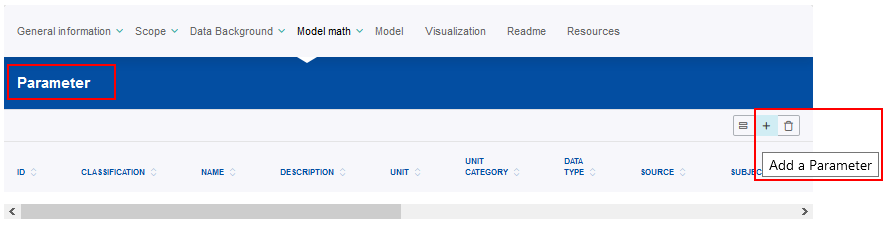
The new parameter setting should be saved by clicking on the Save changes button. 
After saving the metadata setting the new entry will appear in the corresponding metadata list.
An entry in a metadata list can be modified or deleted supsequently by clicking on the corresponding Edith or Trash button. Also the order of the entries in a metadata list can be changed by clicking on the Move up or Move down buttons.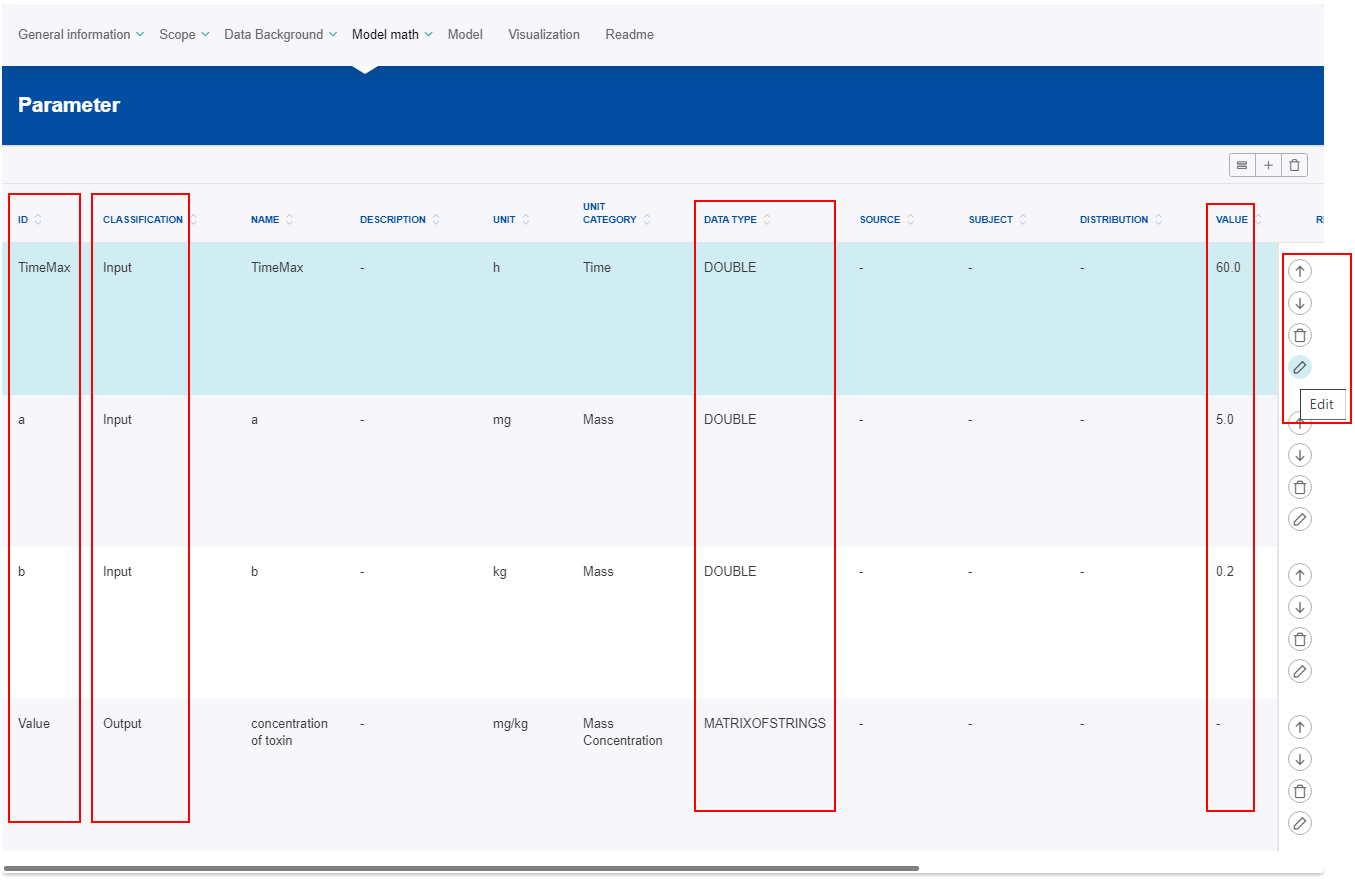
The parameter IDs should be used as names of the variables within the model code.
The values of the parameters which are classified as “Input” can be adjusted in further simulation settings in order to create additional simulation scenarios.
The values of parameters which are classified as “Constant” cannot be modified regarding additional simulation scenarios.
The parameter data type is important for software tools interpreting the metadata and generate user interfaces for parameter input.
For all input parameters (variable and constant) an initial value has to be provided to generate the default simulation.
The value of the output parameters will be calculated during the model execution.
FSKX compliant models are based on script languages. For FSK-Lab v.2.0 (used in FSK-Web 1.0 ) the supported script languages are:
-
- R (BfR default: 3.4.4)
- Python 2 (BfR default: 2.7.13)
- Python 3 (BfR default: 3.5.3)
All attached resource files of the Zenodo record belonging to such script languages (R, Python) will be displayed together on the tab “Model”.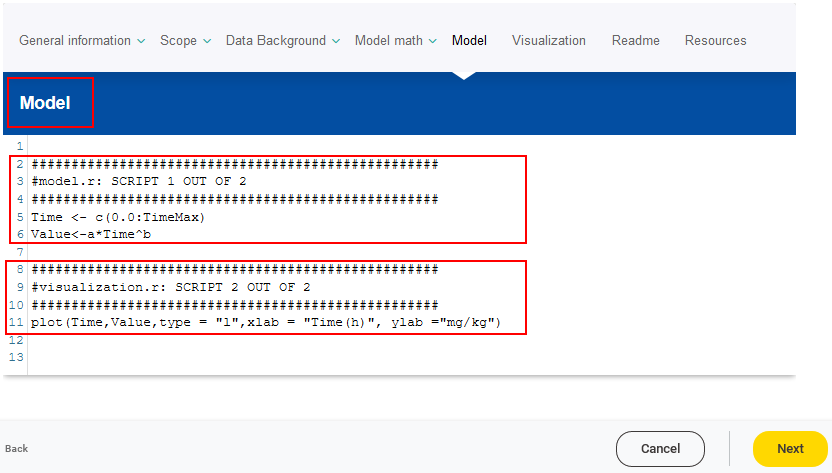
Only the code for the mathematical model should be provided on the tab “Model”.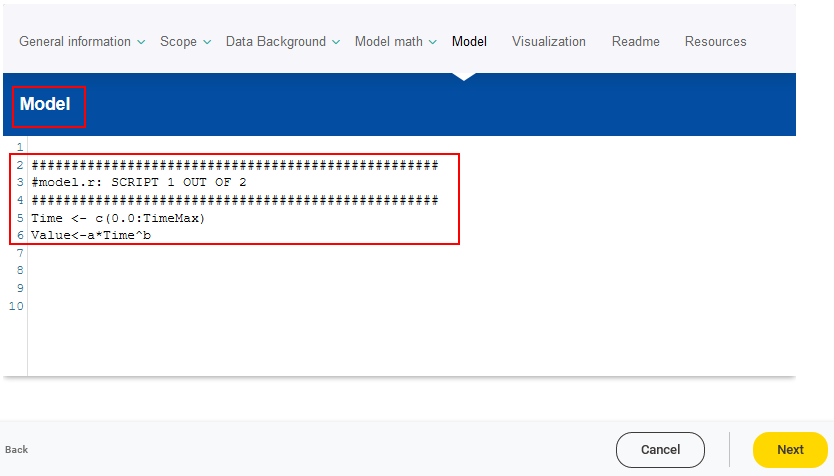
The code for the visualization of the model result (a plot and/or a table) should be provided on the tab “Visualization”.
After the provisioning of all necessary metadata, scripts and resource files is completed in order to create the model, the workflow can be continued by clicking on Next.
The workflow allows to create different simulation scenarios for the FSKX compliant model. The default simulation is based on the input parameters with their corresponding initial values.
The values of the variable input parameters can be adjusted in order to create additional simulation scenarios.
A new simulation setting can be added by clicking on the Add simulation button (plus symbol).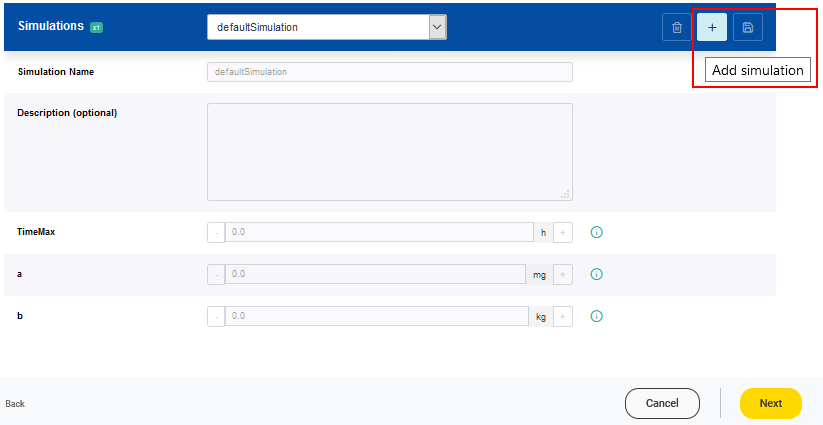
For each new simulation setting a name has to be given. The values of the parameters can be adjusted according to the scenario of interest. It is possible that a range of valid values is predefined for a parameter based on a minimum and a maximum value. Values of parameters which are classified as constant, cannot be modified. To support the user in designing a new simulation, further information of every parameter is displayed when clicking on the corresponding i symbol.
The newly created simulation setting has to be saved by clicking on the Save changes button.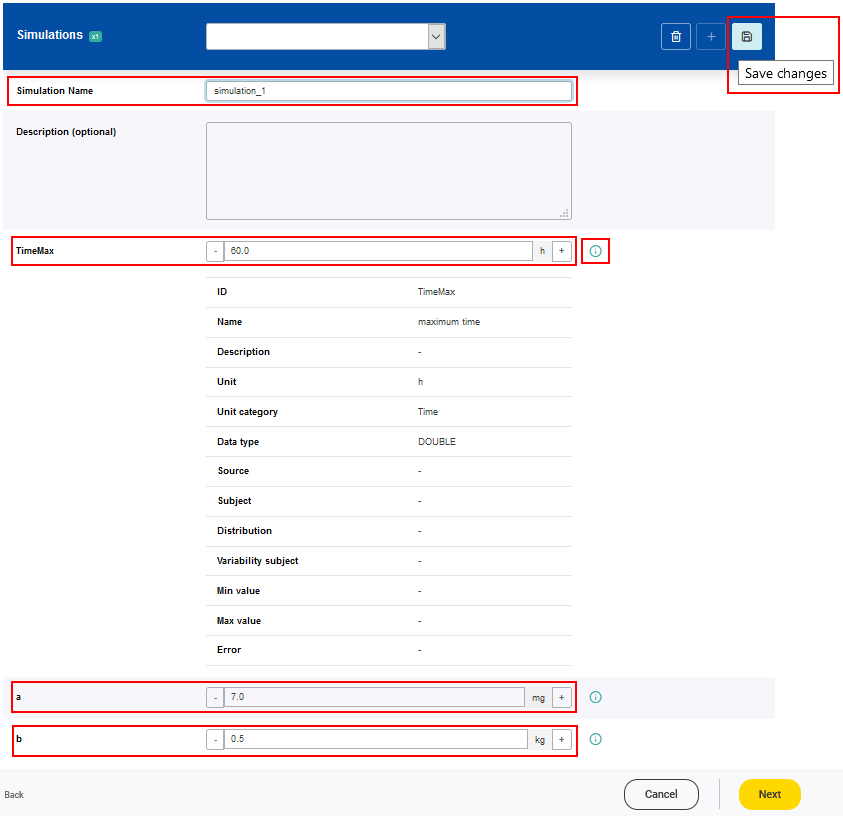
Once one or more simulations have been created, the FSKX file of the model can be generated by clicking on the Next button.
The workflow automatically generates a report showing the plot of the model result. The user can download the created FSKX model.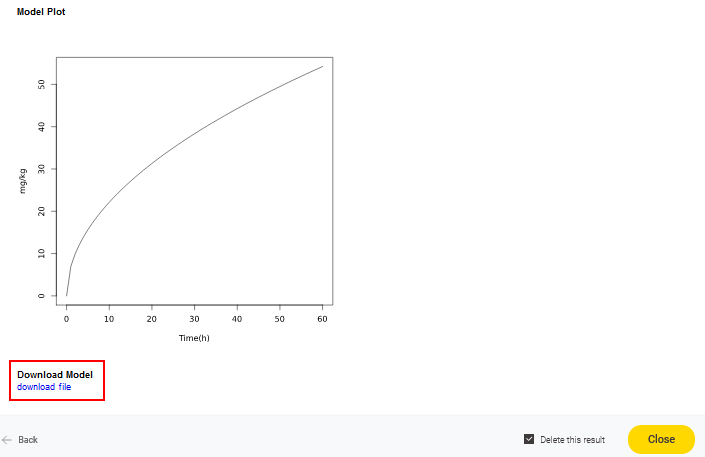
In addition the newly generated FSKX compliant model file will be submitted back to EFSA’s KJ as an update to the original KJ entry, which will be re-versioned. Once the workflow has completely executed, both the original and the FSKX compliant model are available via the KJ.
The new version now contains the updated metadata including the tags (“FSK-Lab” and “fskx”) and an URL under “related identifiers” that allow the model to be executed again in FSK-Web. Note that a new DOI from Zenodo is assigned to the updated version of the model. All versions of the model can be tracked as it is illustrated in the Figure below.
3
The workflow DownloadFromZenodo allows to download and execute a FSKX compliant model from the EFSA’s Knowledge Junction (Zenodo repository) via its REST.
Start the workflow by clicking on the Run button.
The execution of the workflow can be triggered either from FSK-Web using the corresponding DOI of an EFSA’s KJ model or through a specific link that can be provided as a “related identifier: supplementary material” in the EFSA’s KJ model entries. To search for FSKX compliant models in EFSA’s KJ the users can enter the keywords “FSK-Lab” and “fskx” into the search box. All models uploaded to EFSA’s KJ by the two previously described workflows, namely “UploadToZenodo” and “CreateModelFromZenodo”, contain such proper links.
This workflow allows the user to execute the model with the default simulation setting or create a new simulation scenario. The default simulation is based on the input parameters with their corresponding initial values. The values of the variable input parameters can be adjusted in order to create an additional simulation scenario.
A new simulation setting can be added by clicking on the Add simulation button (plus symbol).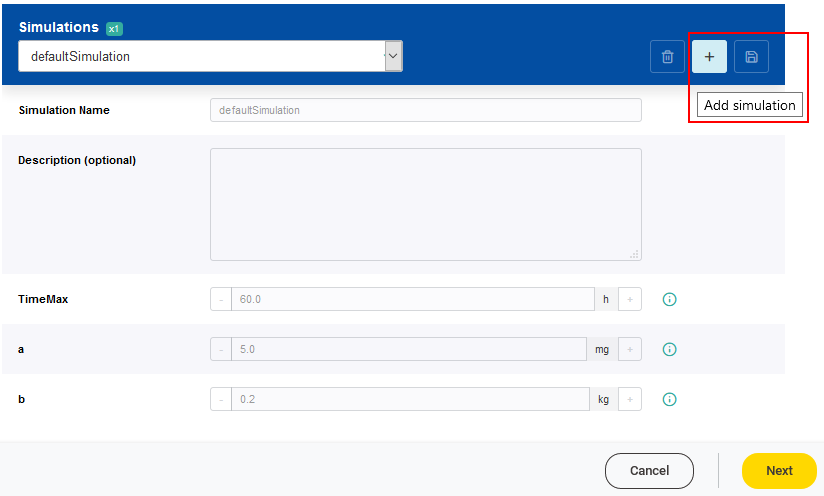
For each new simulation setting a name has to be given. The values of the parameters can be adjusted according to the scenario of interest. It is possible that a range of valid values is predefined for a parameter based on a minimum and a maximum value. Values of parameters which are classified as constant, cannot be modified. To support the user in designing a new simulation, further information of every parameter is displayed when clicking on the corresponding i symbol.
The newly created simulation setting has to be saved by clicking on the Save changes button.
Once one or more simulations have been created, the FSKX file of the model can be generated by clicking on the Next button.
Once the model-based simulation has been executed, a new FSKX file with the new simulation settings and simulation results is created and can be downloaded for further use. The workflow automatically generates a report showing the plot of the model result and the link for downloading the created FSKX model.
This manual was created with support from EU and EFSA funding (GP/EFSA/AMU/2016/01) by BfR. It only reflects the BfR researchers views. Neither EFSA, EU nor BfR is responsible for any use of the website or the service.EFSA is an agency of the European Union